
On this page · 8 sections
Most articles on this question give you a wishy-washy “it depends.” I’m going to give you an actual opinion: for most beginners with small yards, a lean-to is the better choice. A lean-to borrows one wall from your house or shed, while a freestanding greenhouse stands on its own base, open to light on all four sides. But there are clear situations where freestanding wins. Once you have settled on a layout, our best small greenhouse kits roundup covers specific models, including a wall-attached option.
Let me explain why.
What’s a Lean-To Greenhouse?
A lean-to greenhouse attaches to an existing wall of your house, garage, or shed. One side is the building wall. The other three sides are the greenhouse structure. The roof slopes away from the building at an angle.
Think of it as half a greenhouse that borrows a wall from your house.
They typically run 4 to 8 feet deep (out from the wall) and 6 to 12 feet long. A common size is 4x8, giving you 32 square feet of growing space.
What’s a Freestanding Greenhouse?
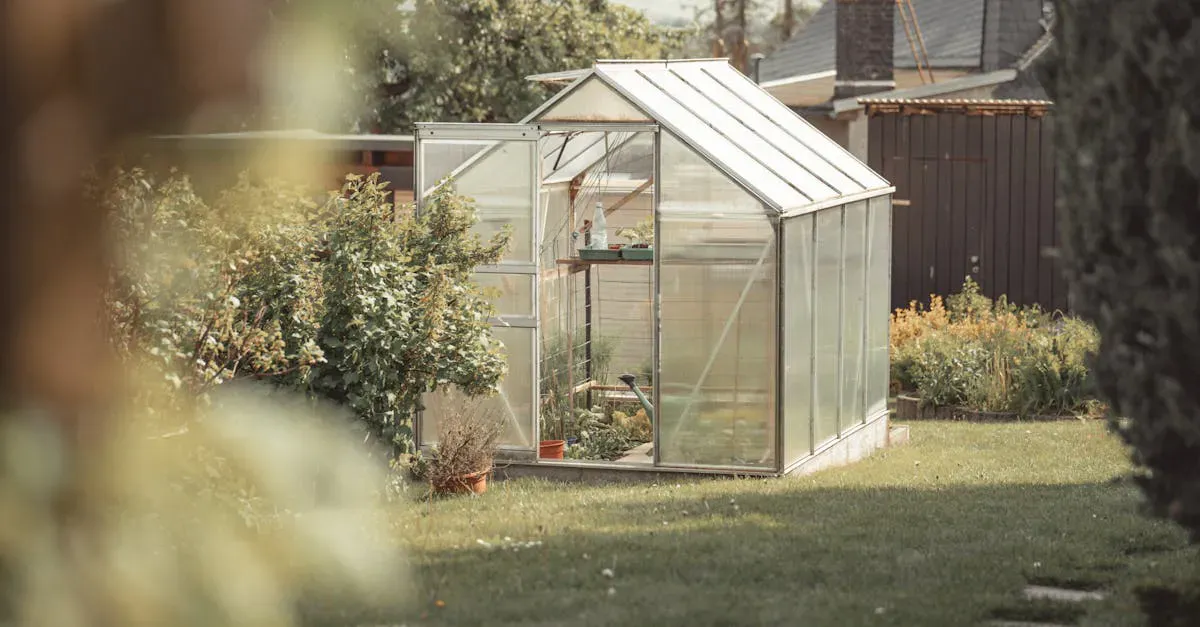
A freestanding greenhouse stands on its own, separate from any building. It has four walls and a peaked or curved roof. These are what most people picture when they hear “greenhouse.”
Common backyard sizes are 6x8, 8x10, and 8x12.

The Real Pros and Cons
Lean-To Advantages
It borrows heat from your house. This is the biggest advantage and the one that saves you the most money long-term. Some of your home’s heat comes through the shared wall, and UGA Extension notes that a lean-to is usually close to available electricity, water, and heat.
How much warmer it stays depends on the wall, the glazing, and the night, so don’t count on the wall alone to keep plants above freezing in a hard frost. A freestanding greenhouse, by contrast, needs its own heating system unless it sits very close to a heated building, and with no heat source it can get nearly as cold as the outside air on a cold night.
It takes up less yard space. A 4x8 lean-to only extends 4 feet from your house. You keep most of your yard. For people with small lots, this is often the deciding factor.
Access is easier. If the wall has a door, you can walk from the house straight into the greenhouse. Step outside in your slippers to water plants. You’ll use the greenhouse more when you don’t have to put on boots and walk across the yard.
It’s cheaper. You’re only building three walls instead of four. Materials cost less. The house wall also provides structural support, so the frame can be lighter.
Utilities are right there. Need an outlet for a fan or heat mat? The house wall probably has one nearby. Need water? A hose bib is usually within reach. Running electricity or water to a freestanding greenhouse in the middle of the yard is a real project.
Lean-To Disadvantages
Limited sun exposure. This is the trade-off. The house wall blocks light from one direction. If your lean-to faces south, you still get great sun. Face it east or west, and you get half-day sun. Face it north, and you’re just growing shade plants and regret.
Size is constrained. You can only go as long as your wall. How far it projects is limited too: the roof has to start below your eaves and windows and still keep enough pitch to shed rain and snow.
The wall can hold moisture. The humid greenhouse air sits against your house. If the wall isn’t properly sealed or if the siding is wood, you can get moisture damage over time.
Your landlord or HOA may object. Attached structures often need permits and may violate HOA rules.
Freestanding Advantages
Full sun from all sides. A freestanding greenhouse gets light from every direction throughout the day. Morning sun from the east, midday from above, afternoon from the west. This matters a lot in winter when the sun is low and every photon counts.
More growing space. You can grow on both sides of the aisle. A 6x8 freestanding gives you 48 square feet with benches on both sides. A 4x8 lean-to gives you 32 square feet with benches on one side only (the other side is the house wall).
Flexible placement. Put it wherever your yard gets the best sun. Not stuck with whatever wall happens to face the right direction.
No risk to your house. Moisture stays away from your siding. No structural attachment to worry about.
Freestanding Disadvantages
It needs its own heating. In cold climates, heating a freestanding greenhouse is the biggest ongoing cost. Without any connection to your house, all heat has to come from the greenhouse itself. An unheated freestanding greenhouse in Zone 5 will drop below freezing on most winter nights.
It costs more. Four walls, a full frame, and usually a bigger footprint means higher upfront cost. A lean-to of similar size and glazing costs less.
Utilities require planning. You’ll need to run an extension cord or bury electrical cable. Water means a long hose or buried pipe. These aren’t hard problems, but they add cost and effort.
Takes up yard space. A 6x8 freestanding greenhouse plus a walkway around it for maintenance uses roughly 8x10 feet of yard space. That’s noticeable on a small lot.
When a Lean-To is the Clear Winner
Pick a lean-to if:
- You have a south-facing or southwest-facing wall with good sun
- Your yard is small and you can’t spare 48+ square feet
- You live in a cold climate and want to keep heating costs down
- You want easy access from inside the house
- You’re new to greenhouse growing and want to start simple
- Your budget is on the modest side
A lean-to on a south-facing wall is hard to beat for the money. You get a warmer growing space with less investment, and you’ll actually use it because it’s right there.
When Freestanding Makes More Sense
Pick freestanding if:
- Your house walls don’t face south (or are shaded by trees)
- You have a medium or large yard with space to spare
- You want maximum growing space
- You plan to grow through winter and are willing to invest in heating
- You want to grow crops that need full, all-day sun
- Your HOA prohibits attached structures but allows freestanding outbuildings
The Hybrid Option Nobody Talks About
Some companies sell “sunroom-style” lean-to kits that are essentially small solariums. They’re designed to attach to your house and function as both a greenhouse and a usable living space. The Palram-Canopia Sun Room below is one of them.
They cost more than a basic lean-to, but they pull double duty. You get a greenhouse that’s also a pleasant place to sit with a cup of coffee in the morning. If you’re limited to one structure, this can be a smart compromise.
Which One Fits Most Small Yards
For most small yards, start with a lean-to. It fits best when your best sun falls on a south or southwest-facing wall and you want to step out to your plants every day. It takes the least yard space and borrows some warmth from the house. Pick a freestanding kit instead if your walls are shaded and you have an open, sunny corner. It gets light from every side and holds benches on both sides of the aisle.

Cost Comparison
- Upfront: a lean-to costs less than a freestanding kit of the same size and glazing, because you build three walls, not four.
- Foundation: about the same for both. Gravel is the cheap option; concrete costs more.
- Heating (Zone 5-6): a lean-to costs less to keep above freezing because the house wall gives off some heat. A freestanding greenhouse needs all its heat from inside.
For a fuller picture of the upfront numbers, our breakdown of small greenhouse costs, kit versus DIY compares buying a finished kit against building from scratch.
Once you’ve decided which style fits your yard, see our picks for both lean-to and freestanding kits to find a well-built model in your budget.